Removing Old Upholstery: A Step-by-Step Guide
Learn how to safely remove old upholstery from your classic car's seats and interior panels. Follow a step-by-step guide to avoid damage. Prepare your car for new upholstery.
Why Removing Old Upholstery Carefully Matters for Classic Car Restoration
So, you're diving into restoring your classic car's interior? Awesome! One of the first steps, and a super important one, is removing the old upholstery. Now, you might be thinking, "Hey, it's old and crusty, I can just rip it off!" But hold on a second. Taking your time and being careful during this process can save you a ton of headaches (and money) down the road. Why? Because the old upholstery can give you valuable clues about how the new stuff should go on. Plus, you don't want to damage the seat frames or any other underlying components. This guide will walk you through the best way to remove it, step by step, to avoid damaging anything.
Tools and Materials Needed for Safe Upholstery Removal in Vintage Vehicles
Before you get started tearing into your seats, gather the right tools. Having these on hand will make the job way easier and prevent accidental damage:
- Screwdrivers (various sizes): You'll need both flathead and Phillips head screwdrivers to remove screws holding the upholstery in place.
- Pliers or Hog Ring Pliers: These are essential for removing hog rings, the little metal rings that hold the upholstery to the frame. Hog ring pliers are specifically designed for this and will make the job much easier.
- Staple Remover: Many times, upholstery is secured with staples. A dedicated staple remover will make quick work of these without tearing the fabric or damaging the frame.
- Putty Knife or Flat Pry Bar: Useful for gently prying off trim pieces or panels that are glued or clipped in place.
- Utility Knife or Seam Ripper: For carefully cutting seams or removing stubborn adhesive.
- Camera or Smartphone: This is super important! Take pictures of everything as you go. Trust me, you'll thank yourself later when you're trying to remember how it all went back together.
- Marker or Pen and Notepad: Label everything! As you remove pieces, label them with their location (e.g., "Driver's Seat Back, Bottom"). This will save you tons of time and frustration during reassembly.
- Gloves: Protect your hands from sharp edges, staples, and grime.
- Dust Mask: Working with old upholstery can be dusty and dirty. A dust mask will protect your lungs.
- Shop Vacuum: To clean up debris as you go.
- Plastic Bags or Containers: For storing removed hardware (screws, hog rings, etc.).
Step By Step Guide To Removing Classic Car Upholstery
- Preparation is Key: Start by taking "before" pictures. Photograph the entire seat or panel, paying close attention to how the upholstery is attached and any unique features. Then, put on your gloves and dust mask.
- Remove Seats or Panels (If Applicable): If possible, remove the entire seat or panel from the car. This will make it much easier to work on and prevent damage to the car's interior. Disconnect any electrical connections before removing the seat.
- Locate Fasteners: Carefully inspect the upholstery to identify all the fasteners holding it in place. Look for screws, hog rings, staples, clips, and adhesive.
- Remove Screws and Bolts: Use the appropriate screwdriver or socket to remove any screws or bolts. Place the hardware in a labeled bag or container.
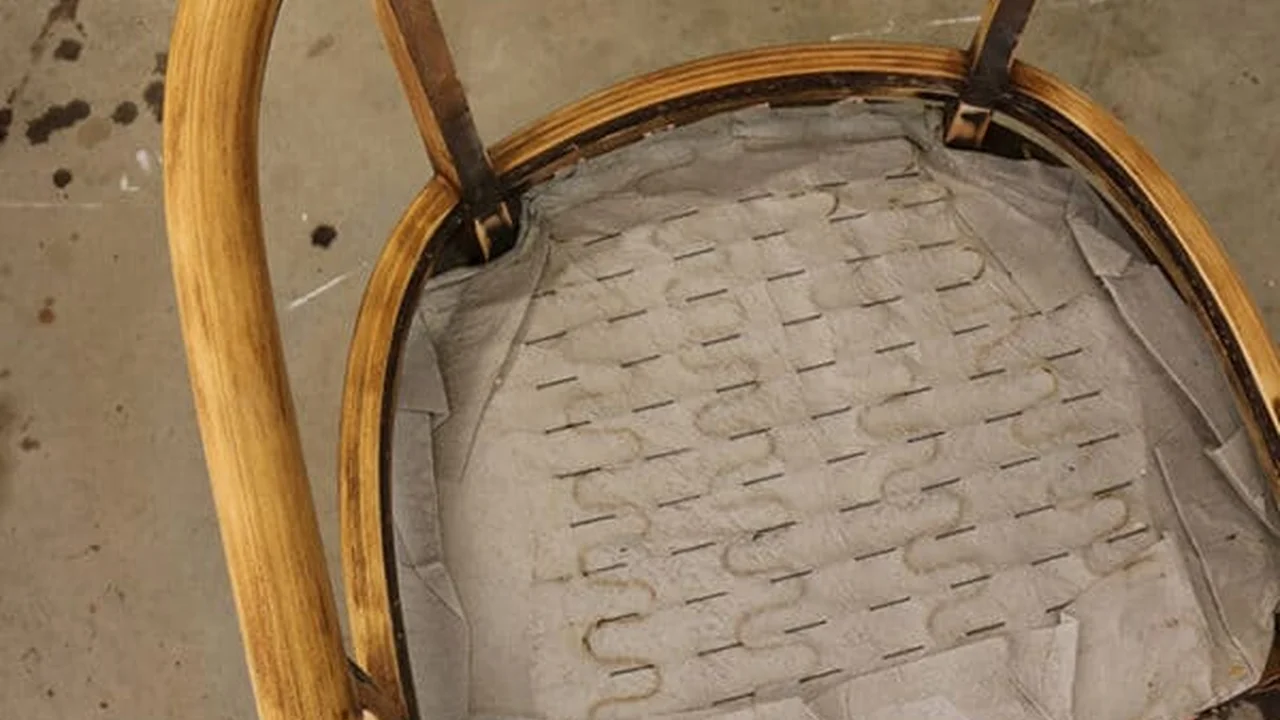
- Remove Hog Rings: This is where the hog ring pliers come in handy. Carefully open the hog rings and remove them from the upholstery and frame. Be careful not to damage the fabric or frame.
- Remove Staples: Use the staple remover to pry out the staples. Work slowly and carefully to avoid tearing the fabric.
- Detach Glued Areas: If the upholstery is glued to the frame, use the putty knife or flat pry bar to gently separate the fabric from the frame. Work slowly and carefully to avoid tearing the fabric. A heat gun (used carefully) can sometimes soften the adhesive.
- Document Each Layer: As you remove each layer of upholstery, take pictures and make notes about how it was attached. Pay attention to the order of the layers and any unique features.
- Inspect the Frame: Once the upholstery is removed, inspect the seat frame for any damage, such as rust, cracks, or broken springs. Repair any damage before installing the new upholstery.
- Clean Up: Use the shop vacuum to clean up any debris, such as dust, dirt, and old foam.
Specific Product Recommendations for Upholstery Removal
Here are a few specific product recommendations to make the upholstery removal process smoother:
- Hog Ring Pliers: The K Tool International KTI72150 Hog Ring Pliers are a popular and affordable option. They feature a comfortable grip and are designed to easily open and close hog rings. Expect to pay around $20-$30. Another good option is the Astro Pneumatic Tool 7837 Hog Ring Pliers which features a magazine feed for faster hog ring installation later. This is a bit more expensive, at around $50-$60.
- Staple Remover: The Arrow GT27 Gated Staple Remover is a simple and effective tool for removing staples without damaging the fabric. It's inexpensive, usually under $10. For a bit more power, consider a dedicated upholstery staple remover like the Stanley 1-19-032 Staple Remover. This provides more leverage and can handle tougher staples. It's around $15-$20.
- Seam Ripper: A good seam ripper is essential for carefully removing stitching. The Clover Seam Ripper is a popular choice among sewing enthusiasts. It's sharp, durable, and easy to use. You can find it for around $5-$10.
- Adhesive Remover: For removing stubborn glue residue, consider 3M General Purpose Adhesive Cleaner. It's effective on a variety of surfaces and won't damage most fabrics. Be sure to test it in an inconspicuous area first. A can typically costs around $15-$20. Alternatively, Goo Gone Automotive is another good option specifically designed for car interiors, and costs about the same.
Comparing Different Upholstery Removal Tools
Let's break down a comparison of some key tools:
- Hog Ring Pliers: Standard pliers can be used to remove hog rings, but it's much more difficult and time-consuming. Hog ring pliers are specifically designed for the task, making it faster and easier. The magazine-fed pliers, while more expensive, significantly speed up the process of re-installing the hog rings.
- Staple Remover: A flathead screwdriver can be used to pry out staples, but it's much more likely to damage the fabric. A staple remover is designed to lift the staple without tearing the fabric.
- Adhesive Remover: Household cleaners may not be effective at removing automotive adhesives and can damage the fabric or underlying surfaces. Dedicated adhesive removers are formulated to dissolve the adhesive without harming the materials.
Common Mistakes to Avoid During Upholstery Removal
Here are some common mistakes people make when removing old upholstery and how to avoid them:
- Rushing the Process: Take your time and work carefully. Rushing can lead to mistakes and damage.
- Not Taking Pictures: As mentioned before, pictures are essential! Don't skip this step.
- Not Labeling Parts: Label everything! This will save you tons of time and frustration during reassembly.
- Using the Wrong Tools: Using the wrong tools can damage the fabric or frame. Use the appropriate tools for each task.
- Applying Too Much Force: If something is stuck, don't force it. Take a step back and figure out why it's stuck. Applying too much force can damage the fabric or frame.
- Ignoring Safety Precautions: Wear gloves and a dust mask to protect yourself from sharp edges, staples, and grime.
Preparing for New Upholstery After Removal
Once the old upholstery is removed, take the time to prepare the seat frame for the new upholstery. This includes:
- Cleaning the Frame: Remove any rust, dirt, or debris from the frame.
- Repairing Damage: Repair any damage to the frame, such as cracks, broken springs, or worn-out padding.
- Applying Rust Inhibitor: Apply a rust inhibitor to the frame to prevent future corrosion.
- Replacing Padding: Replace any worn-out or damaged padding.
By following these steps and taking your time, you can safely and effectively remove the old upholstery from your classic car and prepare it for a beautiful new interior. Good luck!
:max_bytes(150000):strip_icc()/277019-baked-pork-chops-with-cream-of-mushroom-soup-DDMFS-beauty-4x3-BG-7505-5762b731cf30447d9cbbbbbf387beafa.jpg)